
If your hosting plan did not include a domain name, then you will need to purchase it separately.
But, before we get into that, let me briefly address what a domain name is…
This post is part of a 14-step series on creating a website for your band using WordPress. Click here to go back to the main page.
What is a Domain?
Simply put, the domain is your actual website address. For instance, www.yourwebsite.com. You can also get different domain extensions like “.co”, “.net”, “.org”, etc.
That is all it is. It is not the place where your actual web files will sit. It is just the website name.
One important thing to note is that “owning” a domain is not a one-time purchase. You have to pay yearly to keep that domain. If you don’t renew your domain, it goes back out there into the “inventory” of domain names that someone else can purchase. A “.com” domain is approximately $15/year.
Where to Purchase Your Domain
There are a number of different companies you can buy your domain name from; 1and1, Hostgator, GoDaddy, etc. I’m not going to go into full detail on these like I did with the hosting plans because any of them will get the job done.

The company I use to register all of my domain names is 1and1.com. No real rhyme or reason to it. It’s just the one I chose. However, they do have a nice layout and when you sign up for your first “.com” domain, it’s only $0.99 for the first year. Then, it’s $14.99/yr after that.
One advantage to buying your domain from another company than the one you purchase your hosting from is that should you ever decide to switch hosting, it can be a bit easier to point your domains to your new host. You don’t have to deal with transferring domains, you can just go to your domain settings and point it to your new hosting provider.
Now, unfortunately, unless your band name is something specific or unique, there’s a high possibility that the “.com” domain name you want will be taken.
For instance, let’s say your band name is “Midnight”. Midnight.com is already taken (unfortunately by a “Cyber Squatter”, someone that buys a domain and will sell it to whoever wants it at an inflated price). So you might need to get the “.co” or “.net” version of the name or change the name a bit (for instance, adding “band” to the end of the domain name, so it reads “midnightband.com”).
Personally, I would recommend getting the “.com” domain extension in any case. Even if that means changing up the name a bit to get it. It’s just easier to tell people your website is “example.com” than “example.net” or “example.co”. People are just more familiar with entering in “.com” so it’s a safer bet for them to remember.
If your hosting package came with a domain, you can skip ahead to Step 3 on installing WordPress . If not, follow the instructions below to buy your domain and direct it to your hosting company’s servers.
How to Buy Your Domain
For this tutorial, I’ll be using 1and1.com to demonstrate how to find and buy a domain name.
First, head over to 1and1.com. On the homepage should be a large box to input your desired name and check if it’s available:

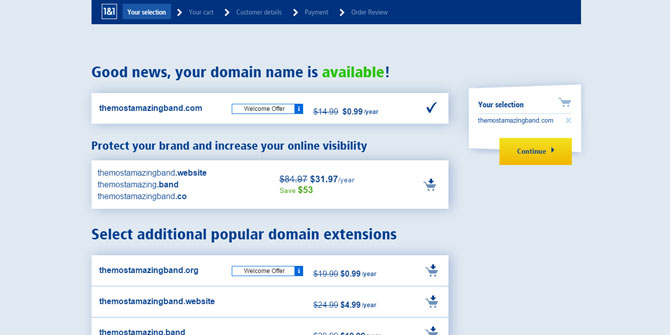
Just enter your desired name (likely the name of your band) and hit “Check” to see if it’s available. If the “.com” extension is available, you’ll be greeted with a screen like the one below and you can continue you on to purchase (“rent”) it:
If it’s not available, you’ll be given the following screen letting you know it’s already taken:
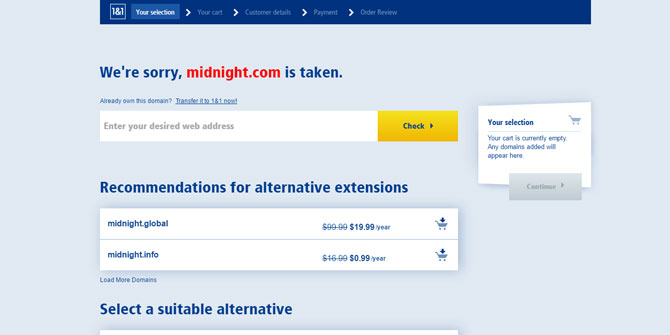
You can either choose one of the other domain extensions that are available (like “.info”, “.co”, etc.). Or, you can come up with a different domain name (possibly by adding something like “band” to the end of your name) and continue checking until you find an available “.com”.
Like I mentioned earlier, I would recommend trying to get a “.com” name.
How to Point Your Domain to Your Hosting Provider
If you purchase your domain from a company other than your hosting provider, you will need to point that domain to your hosting provider. Pointing basically lets your hosting company know that you own that domain and enables you to use it for your website.
Again, I’m going to use 1and1 as an example. So if you want to follow this tutorial to a tee, you will need to purchase your domain using 1and1. However, almost any other place you would buy your domain from will have a similar process and will likely have a resource on how to do it.
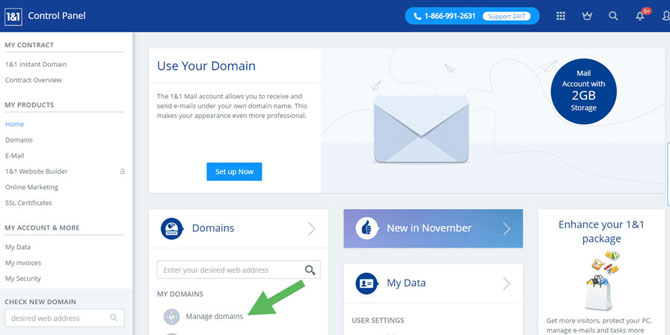
First, login to your 1and1 account. You will be directed to your control panel. Locate the “Domains” box and click on “Manage domains”:
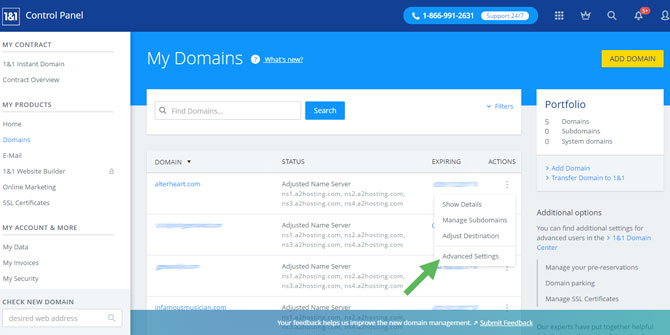
You will then be directed to the “My Domains” page. Find the domain you want to point to your hosting provider. Then click the 3-dotted button to the right. A drop down box will appear. Click on “Advanced Settings”:
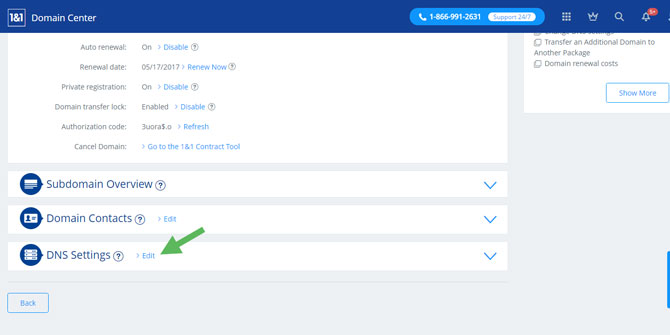
When you do this a box will up confirming you want to edit these settings. Click “Continue”. You’ll then be directed to the Advanced Settings page for that domain. Scroll down until you see “DNS Settings” and click “Edit”:
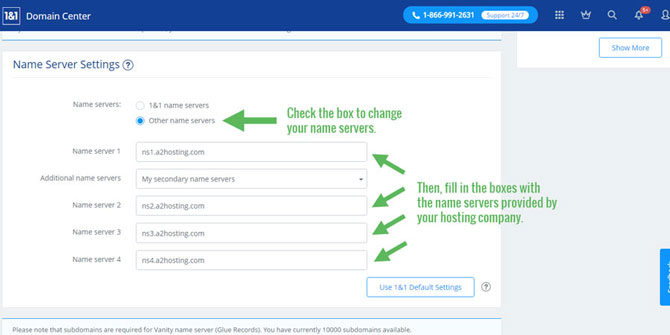
You’ll then be brought to the DNS Settings page. Scroll down until you see “Name Server Settings”. There will be a radio button box. Select “other name servers”. Then in the name server input boxes below that add the name servers for your host. If you went A2 Hosting, you can copy the image below:
Save your settings and you should be all set. It may take some time for the settings to take effect (up to 24 to 48 hours). But a lot of the time it is much quicker than this.
If you have any questions, leave them in the comments below and I’ll do my best to answer them. Otherwise, with that done, let’s move onto Step 3: Installing WordPress.
Or, click here to head back to the main page

They must of changed their website, I’ve registered my domain through 1&1, and following your steps to transfer domain there is no longer a “Advanced Settings” button. I’m not sure how old your step by step is, but they must of changed the format.
Hey Tom, yes they must have updated their interface. Now, when you login, under “My Domains” click “Manage Domains”. From there, you’ll see a list of your domains, next to the domain click the gear icon, then click “Name Server”. Then, click “Edit Name Server”. From there, you’ll be able to point the nameservers to your hosting. Hope that helps!