Today I have a special treat for you. If you’re looking to build your own basement recording studio, then this is the post for you! Below, my buddy Matt from Boston, MA, covers how he (with the help of a few friends) built his own studio in the basement of his attached townhome. The end result is a soundproof recording studio/practice space that the neighbors didn’t even know existed until they saw his band loading in one day.
I hope you enjoy this post and I want to say thanks to Matt for the detailed write-up. If you find the content helpful, make sure to support his band, Beacon Project, by visiting their website and streaming their music or buying some merch. If you’re in the Boston area, make sure to check them out live too! Let’s get to it…
The following is a small write up for my studio build:
I’m an architectural designer/amateur musician located in a suburb of Boston. While the space I chose to create my studio was not completely ideal, it serves my purposes for containing rock band sound levels in the basement of a townhouse with attached neighbors.
The first steps for this space were prepping the basement.


When the townhouse was purchased, the basement was semi-finished (albeit poorly), with wood-paneled walls, segmented into several rooms, and a suspended ceiling.
To further complicate things, there was an oil tank where I wanted to put my studio. All of this was removed over the course of about 4 months (timetable mostly due to oil tank removal and new heating system install). During this time, I consulted with friends and mentors in the architecture field, as well as the folks at The Soundproofing Company to plan my build.

I chose a corner of my basement and a rectangular room to take advantage of two exterior foundation walls, keeping the room as far from my attached neighbor as possible.
Unfortunately, the mechanical, electrical, and structural systems are spread throughout my basement, so regardless of location, I had to deal with at least one or two of these obstacles. In my case, I had to deal with a column in the middle of the room, as well as the house’s electric panel. I was also constrained with the location of the bulkhead, which ended up defining the width of my studio.
First up, I insulated the first-floor plate with batt insulation. This helped to control sound escape from the basement, as well as heat loss. (~8 hours)
Next, was framing the room.


I opted for the most effective (isolating) solution → two 2×4 walls @ 24” on center, spaced 1” apart, a room within a room. This included a 1” gap between the exterior foundation walls and wood framing.
The inside room is a standalone room, roughly 10’x14’, completely isolated from the rest of the townhouse (untouching). The sill plates of the walls are separated from the slab they rest upon via a noise-proofing (padded) joist tape.
The ceiling is framed with doubled up 2×4’s @ 16” O.C. (to carry the drywall load) on the short span direction of the room, set just below the floor joists above, again the air space. I could get away with joists this small due to the span, no live load, and minimal dead load → please consult a professional for your own application on this!
I created another set of 2×4 walls around the column, again with a 1” air space around it. I ended up elongating one dimension so the ceiling joists could go around the beam resting on the column and attach to the boxed out framing. I also jogged the wall out around the electric panel, kind of a nuisance, but I needed to create a 3’ wide hatch/door for the electric panel by code. (~40 hours)
The outside “room” consists of two 2×4 walls, which connect to the two exterior foundation walls, floor joists above, and rest on the concrete slab, again isolated by the joist tape. (~20 hours)
With the major framing done came framing for services. I created a soffit inside the room on one end for ventilation, and the same thing outside the room. More on this later. I also installed all the boxes for electrical outlets and light switches, and boxed them out too. Each outlet and light switch is a hole in the room. (~8 hours)
Thus, electrical commenced next.


I installed outlets on every wall (looking back I wish I’d done more). They run on two circuits, one circuit for most outlets, and a separate one for the future desk and recording equipment.
I installed one surface mounted light fixture on a wall for my future desk, primary lighting for the room would later be string lights hung on the walls. I did not do ceiling lights due to the 7’ finished ceiling height (6’-8” is required by code), limited plenum space above the finished ceiling, and I did not want more holes to seal later.
All outlet, switch, and j-boxes were sealed with acoustic putty pads sourced from The Soundproofing Company. Not only do they provide soundproofing, but they also provide fireproofing. I also installed a ventilation unit in the soffits, wired to its own circuit with the rest of the basement lighting. I had all electrical checked over by an electrician friend. (~12 hours)
Next up, insulation.


All insulation was batt insulation; it was tough to find 24” wide batt insulation. At this time, I also installed insulated ducting, zigzagging from the ventilation unit through the outside soffit, and then zigzagging through the inside room’s soffit.
The bends kill the noise created in the room. I also stuffed batt insulation around the ducting inside the soffit.
I installed two solid core doors, hinged on opposite sides and in opposite directions, one in each wall. I also installed door seals on the inside door, sourced from The Soundproofing Company. I only did the inside door due to price, figuring if it wasn’t enough I could always do the outside door later.
The outside door was sealed with basic weather stripping. I created a door for the electric panel hatch with 2 sheets of ¾” thick plywood, green glue in between, and a weatherstripped door frame. (~20 hours)
Next came the really unfun and tedious part. The inside and outside rooms were each sheathed with two layers of ⅝” type x fire-rated drywall, with a green glue coating between the panels, sourced from the soundproofing company, and overlapping seams at the corners.


No secrets here, just a lot sweat, tears, and grunting. Next was mudding, and taping all seams and sanding to a flat finish. To finish the room, I chose red and grey paint for the walls, and white for the ceiling. (~80 hours)


Ultimately, it is not a project I would recommend to anyone unfamiliar with construction. Too many specialty scenarios. i.e. proper framing techniques, electrical work, mechanical, drywall finishing, pure labor alone. Those sheets of drywall weighed 80 pounds apiece, and we lifted and held them in place while screwing, almost 50 sheets.
fastening the sill plates to the floor took a literal gun, that required about 100 lbs of pressure on the gun while shooting (hurt like a b**ch when it fired).
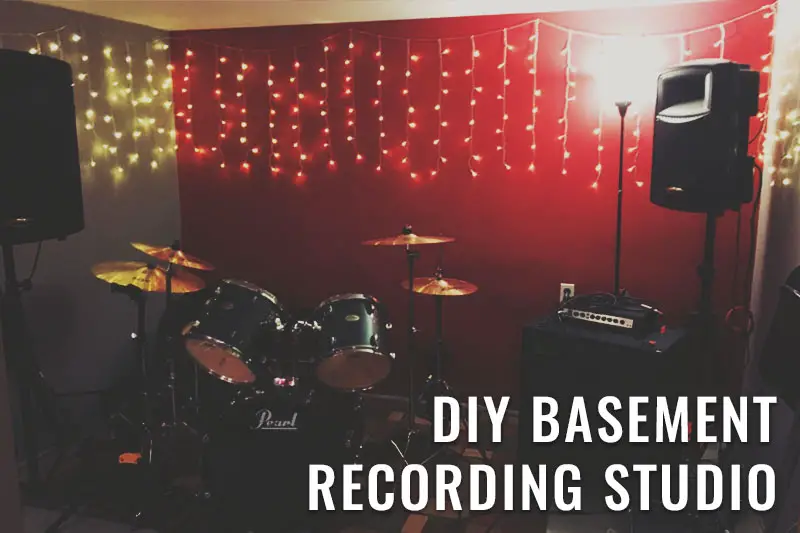
Anyways, my estimation of the finished product is around 110 decibels inside the room, which reduces to roughly 50-60 decibels outside; it just sounds like a stereo is playing.
My attached neighbors actually didn’t know a rock band was playing in the basement for several months (until they saw us hauling our amps and drums in and out). Success! The final bill was a lot more than I’d planned for (~$4.5k), but it’s already been worth it 1.5 years in due to the price of practice space rentals in Boston.
If you enjoyed this post, make sure to support Matt’s band by visiting his band’s website here and streaming their music or buying some merch.


Must have acoustic foam for a recording studio. Don’t see any.
Not for a live room and then only if you have mid/high frequency issues you don’t like.
I’m still a beginner and am looking for information on Recording, Recording Vocals using Presonus Studio One.
Any input you might share, no matter how basic would be much appreciated. I’m very close to completing my Home Studio with gear. But I’m a singer not an engineer or recording producer.
Thank you from Austin, Texas.